
What Happens During a Static ADAS Calibration? A Step-by-Step Look
You’ve just had your windscreen replaced, everything looks perfect, and you’re ready to get back on the road. Or so you might think! However, modern windscreens often contains a variety of technologies that require specialist attention before you’re once again ready to take to the road. This is where ADAS calibration comes in.
Advanced Driver Assistance Systems, or ADAS, are now present in the majority of modern vehicles. Features such as lane keeping assistance, automatic emergency braking and traffic sign recognition rely on cameras and sensors to monitor and respond to what’s happening around your vehicle. If the position of those sensors changes, even slightly, their accuracy can be seriously hindered.
Static ADAS calibration is essentially the process of realigning these sensors following a replacement to ensure they are still working as they should. At Autoglass® Ireland, we use specialist Bosch equipment and diagnostic technology to carry out precision calibration in a controlled workshop environment. Our Bosch ADAS calibration process is designed to ensure the vehicle’s camera and associated safety systems are correctly aligned with the stated manufacturer’s requirements and that your car remains as safe as it can be.
With all that said, what actually happens during calibration? How about we take a step-by-step look at the process?
But first, lets take a look at a very quick summary of the process..
Quick Summary: How Long Does a Static ADAS Calibration Take and What is Done?
A static ADAS calibration typically takes around 30 to 60 minutes, although the exact time depends on the vehicle and its manufacturer’s requirements. The main ADAS calibration steps involve; a pre-diagnostic scan and vehicle preparation, precise rig alignment, manufacturer-specific target setup and digital calibration using specialist software. The Bosch DAS 3000 calibration system provides our specialist technicians with the equipment needed to complete this process accurately and efficiently.
Step 1: Pre-Calibration Diagnostic Scan & Vehicle Prep
The calibration process actually begins the moment your car enters our workshop, before the new windscreen is fitted. Because Autoglass® provides ADAS calibration exclusively as an integrated part of a windscreen replacement job rather than as a standalone service, this initial diagnostic and physical preparation ensures your vehicle’s safety systems are fully cleared for a successful installation. Static calibration relies on precise physical measurements, so our technicians first ensure the vehicle is sitting correctly and that no outside factors will hinder the calibration process.
This opening stage involves checking tyre pressures, fluid levels, and the general condition of the vehicle. Correct tyre pressure is critical, as significant differences can alter the vehicle’s height and shift the alignment of the sensors in and around your carglass. Our technicians also carry out a thorough workshop vehicle alignment check to establish that the vehicle is correctly positioned according to the manufacturer’s requirements on an appropriate surface with sufficient surrounding space.
The electronic assessment at this stage is equally vital. An ADAS pre-scan allows Autoglass® technicians to use Bosch diagnostics to check the vehicle’s electronic control units for any existing faults. Our goal is to achieve a “clean sheet” before proceeding. If faults are found in the camera system, our technicians will attempt to clear them first.
However, some vehicles carry “embedded” faults that can only be cleared by a main dealer. Because the vehicle’s camera system must be completely fault-free before the new glass is installed, if an embedded fault is detected, we will pause the job and refer you to your main dealer to resolve the issue before we can safely fit the windscreen and perform the final calibration.
By establishing this clean starting point physically and electronically, we ensure that your camera systems are perfectly prepared before the glass is fitted and the final calibration is completed.
Top 5 Signs Your Car’s ADAS Sensors Are Out of Alignment >>
Step 2: Precision Alignment of the Bosch DAS 3000 Rig
With the vehicle prepared, the next stage is positioning the calibration equipment.
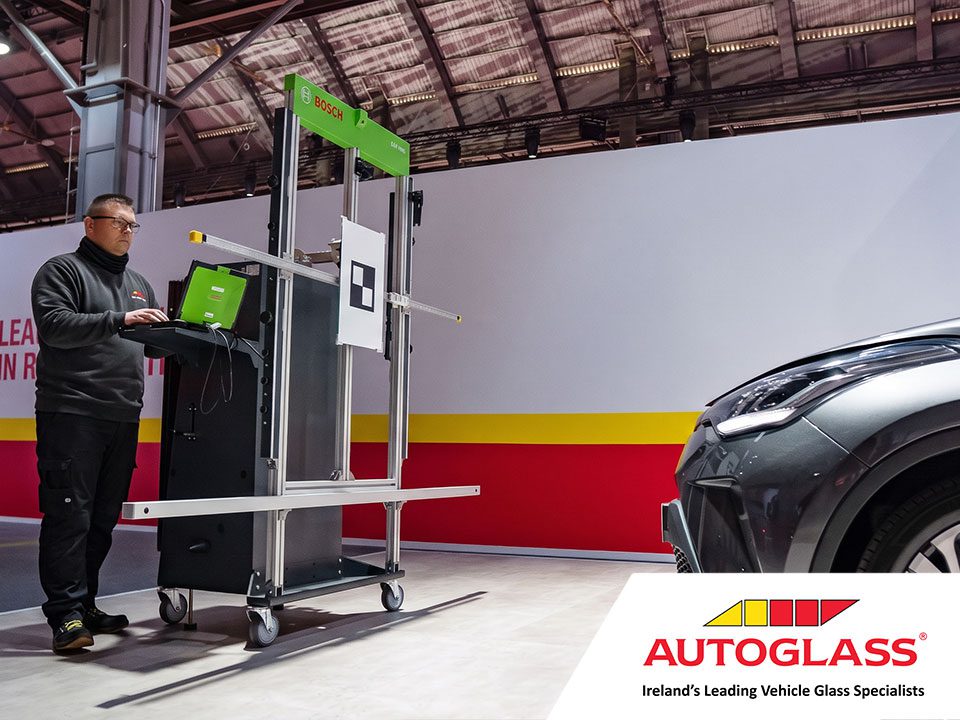
The Bosch DAS 3000 setup is designed to provide a highly accurate reference framework for calibrating your car’s onboard cameras and sensors. Our technicians position the calibration frame at the distance specified by the manufacturer of the particular car being worked on.
This is where ADAS calibration rig positioning becomes particularly important. The calibration frame needs to be correctly aligned with the vehicle rather than simply placed directly in front of it. Its position is established in relation to the vehicle’s specific centreline and rear axle thrust line.
Specialist measurement equipment, integrated laser technology and wheel clamps can be used to establish the correct relationship between the vehicle and calibration rig. The objective is to ensure the frame is square to the vehicle and positioned at the precise distance specified by the manufacturer’s calibration procedure.
Even a tiny error in positioning can make a major difference when it comes to your car’s camera’s reference point. While the exact tolerances often varies between vehicles. That is to say that calibration equipment therefore needs to be positioned with the upmost precision.
Once the rig has been correctly aligned, our technician can move on to setting up the target that your vehicle’s camera will use during the calibration process.
How Modern Car Safety Features Actually Work >>
Step 3: Setting Up Bosch Vehicle-Specific Calibration Targets
The next stage of recalibration involves selecting and positioning the correct calibration target for the vehicle.
Different vehicle manufacturers use different camera systems and calibration specifications. As a result, there isn’t really a single universal target that works for every vehicle. So, it falls to the technician to select the appropriate Bosch calibration boards and position them on the calibration rig in line with the manufacturer’s specifications.
These boards contain carefully designed visual patterns that the forward-facing camera can recognise. The camera uses these references to establish its correct position and field of view.
This aspect of the process is particularly important when working with static camera calibration patterns. The vehicle isn’t simply being shown a random image. The target is positioned at a measured distance and angle so that the camera can compare what it sees against a precisely defined reference.
The process doesn’t end there, the surrounding area matters too. Workshop environment control is an important part of successful static calibration. The calibration bay needs suitable flooring, appropriate lighting and enough clear space for the vehicle and equipment. Reflections, shadows, obstructions or unsuitable lighting can interfere with the camera’s ability to recognise the target correctly.
The technician therefore takes care to ensure the target is clearly visible and that nothing interferes with the camera’s view. Once the target and vehicle are correctly positioned, the physical part of the calibration setup is complete.
The Evolution of ADAS: A Look Back and Ahead >>
Step 4: Digital Calibration and the Post-Scan Validation
This final stage sees a technician use the Bosch ESI [tronic] software platform and the appropriate diagnostic procedure to initiate your car’s calibration as the software communicates with the vehicle’s electronic control systems. The vehicle’s forward-facing camera uses the precisely positioned calibration target as its reference. The system can then establish the correct baseline for the camera’s view, effectively teaching the vehicle where its “straight ahead” position should be.
This process is the core of digital static calibration as a practice. Rather than relying on an approximate adjustment, your car’s electronic systems are calibrated using precise physical references and manufacturer-specific specifications.
Once the calibration has been completed, our technicians carry out a thorough post-calibration diagnostic check. This check provides an opportunity to confirm that the relevant systems have accepted the calibration and that there are no outstanding diagnostic faults affecting the functionality of your car’s ADAS features.
One crucial thing to keep in mind is that calibration is not simply a final button press. The accuracy of the calibration depends on every stage beforehand, from vehicle preparation and rig positioning through to target selection and finally electronic calibration.
Frequently Asked Questions About Static ADAS Calibration
What is a static ADAS calibration?
Static ADAS calibration is performed inside a specialist workshop. The vehicle remains stationary while technicians use precision equipment and fixed calibration targets. The camera or sensor is calibrated against these measured references rather than being calibrated while driving.
Can I drive my car away without doing this calibration?
If calibration is required for your vehicle, it should not be ignored. An incorrectly calibrated system may affect lane assistance, emergency braking or other ADAS safety functions. Some systems may also disable themselves entirely or display warning messages until a full calibration is completed.
Does my insurance cover ADAS calibration?
Coverage depends on your individual insurance policy and the circumstances of the repair. When calibration is required as part of a covered windscreen replacement, it may be included. Always check your policy or speak to your insurer for confirmation.
From Horsepower to Software: How Cars Became Platforms >>
Trust Autoglass® Ireland for Certified Bosch ADAS Calibration
As we’ve seen, today’s windscreens are a whole lot more than just a sheet of glass. For vehicles equipped with camera-based ADAS, windscreens are just one part of a sophisticated safety system.
That’s why getting calibration right matters. Cutting corners with workshop calibration could mean compromising the accuracy of systems designed to support you in an emergency.
Autoglass® Ireland combines specialist technicians with advanced diagnostic and calibration equipment to support the requirements of modern vehicles. Our technicians are trained to work with the increasingly sophisticated technology found behind today’s windscreens.
If you’ve recently had a windscreen replaced, check whether your vehicle requires ADAS calibration. If you’re arranging a new windscreen, our team can help identify the requirements for your vehicle and explain what needs to be done.
For more information or to arrange a windscreen repair or replacement, contact Autoglass® Ireland today.
As ever, thanks for checking in with the Autoglass® Ireland Blog and we hope you found this article enlightening. Check back soon for more practical advice, tips and guides for all things car glass and motoring.
Safe travels!
Book an appointment now
For a quick and easy way to make an appointment book online now.